Yet Another Home Lab (YAHL) — (1) Prepare the (Physical) Container
Introduction to the series
I’ve been running a fairly large home lab for a few years, but when I moved my home lab to a new physical location, I knew I wanted to build an environment that was optimized for running a home lab itself.
This series will follow me as I literally build my home lab environment from the ground up.
I’m starting this series with the hope that my thoughts and trials and errors at each stage will inspire and help others who are planning to do something similar.
For my previous home lab design, see my blog in Korean. If you can use Google Translate, you shouldn’t have too much trouble reading it.
Why a container?
“Why containers?” you might ask.
The truth is, I didn’t always consider building a container (physical, I mean) either. Due to real estate contract issues with my existing building, I was forced to demolish the facility and my first thought was to move to another building nearby.
However, the situation was not so easy. There was no access to high-capacity electricity (I needed at least 20 kW of power), the rent was too high, the building was poorly insulated, or the noise would disturb other tenants.
The next thing I looked at was already well-equipped commercial facilities, especially what they called “Apartment-style Factory” in Korea. I’m not sure what this type of building is called in the U.S. or elsewhere, but it’s a combination of small offices and home-based factories form in a multi-family residential.

The facility was able to solve the electricity problem, but it was too inaccessible for the low rent, and the noise and insulation issues were still unresolved.
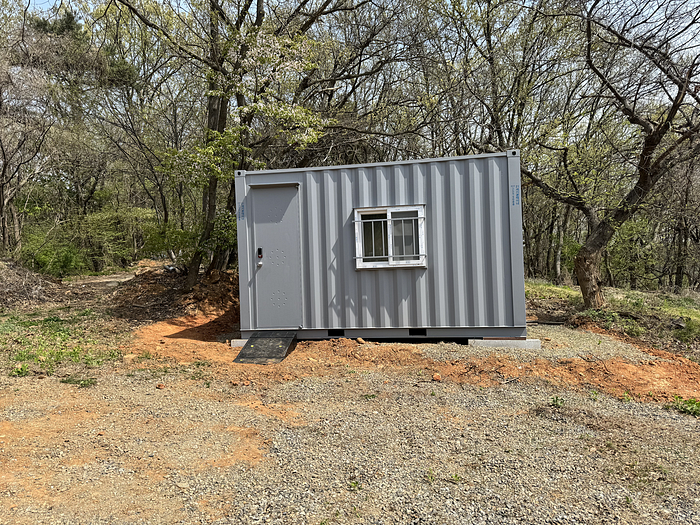
Then, a friend of mine who was working on the this project with me offered to give us a piece of land, and we looked at what we could build on it and decided on building a container.
Container design
Now that I have the form of the building and the place to put it, it’s time to design the spaces within it.
I wanted to use outdoor air conditioning in the non-summer months to save on electricity bills for cooling, so I built a separate mechanical room for this purpose.
I decided to install cable trays for wiring on the top of the racks, and create a space for piping air ducts to pass through to bring in fresh air.
Since the mechanical room will have ventilation fans, we decided to install a false wall to reduce the noise a bit.


Initially, I planned to build a container that was 21 feet (6.4 meters) long and 11 feet (3.3 meters) wide, but the width of the driveway did not allow for the turning radius of the truck that would move the container, and I had to scale it down.
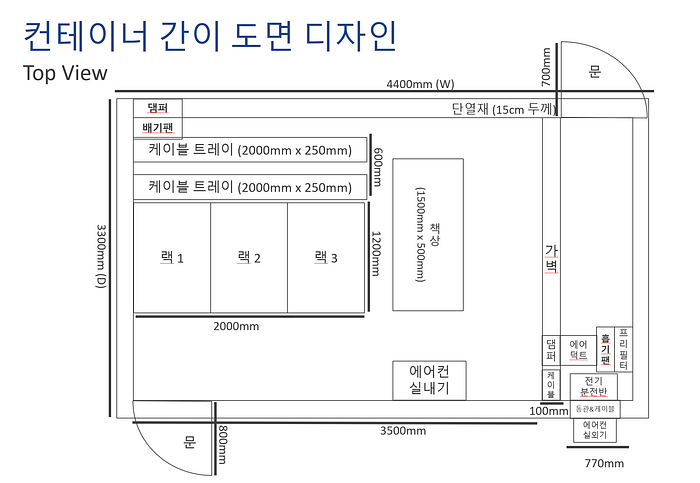
Reducing the length to 14.5 feet (4.4 meters) significantly reduced the width of the machine room and reduced the number of racks from four to three.
In the illustration, the cable tray is placed behind the rack for visibility, but it will actually be on top of the rack.
Now communicate these design requirements to the container maker and exchange feedback. I check the types of insulation available and ask them to put in the highest performance insulation possible. I also pre-installed a ventilation fan for exhaust, and a door that is wide and tall enough for the server rack to fit through.
Despite the fact that this container is not a standard size, the overall price came out cheaper than I expected. The cost performance of the container for a simple structure is unbeatable.

Installing a ramp
After receiving the container, I realized that I needed to install a ramp to match the height of the container.
I didn’t want to have to lift and move heavy server equipment and racks by hand.
My first thought was to call a contractor to install a ramp. But when I realized that the cost would be prohibitive for the labor required, I started looking for other options.
My final choice was to purchase a prefabricated ramp like those used in parking lots.
The main advantages were that they were factory-made, standardized, and inexpensive, and since they were designed to support the weight of cars, they could naturally support the weight of server equipment.
Leveling the ground, adjusting the height, and more were required for the ramp installation, but it was successful.
The angle was steeper than I expected, so I’ll have to be extra careful when pushing the server racks around.
Outro
As I started to create an environment for my home lab from scratch, I learned a lot of things I didn’t know before.
One of the most challenging was the compromise between cost and quality. If I had an unlimited budget, I would have built a building instead of a container, but realistically that was not possible.
However, I was able to achieve my goal of creating a space to create a home lab as cheaply as possible, and in the next article I will talk about the construction of the air conditioning and electrical installation.